 Compared to the barrage of complaints and insults aimed at Microsoft’s previous operating system, Vista, Windows 7 has shed a new light of hope for Microsoft. Although Windows 7 has garnered much more positive reviews than it’s predecessor, these are a few quick fixes you may want to perform for a better user experience.
Show the selected folder in Windows Explorer’s left pane
 When browsing through folder content in previous version of Windows, the expandable treeview of your drives in the left-pane of Windows Explorer would automatically expand to to show the current folder in its proper hierarchy. As you delve deeper into folders in the right pane, the left pane updates to reflect your current location.
This is not the case in Windows 7. In a change from previous versions of its operating systems, Microsoft has disabled automatic folder tracking by default in Windows 7. Here is how to see the selected folder in Explorer’s left pane again:
- Use Windows Explorer to browse to any folder
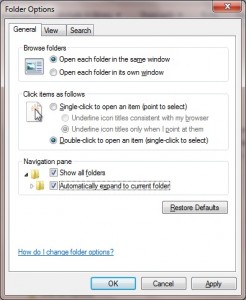
- Click Organize in the top toolbar, and select Folder and search options.
- Check the box that reads “Automatically expand to current folder” under “Navigation pane” on the General tab.
- Click OK.
The left-pane should now automatically expand to show the current folder you are viewing when using Explorer.
Set Windows 7 to reopen folder windows to their previous size and location
In previous versions of Windows, if you closed an open folder and then re-opened that same folder later, the OS would remember the dimensions and location of that folder. In this way, when you re-open the folder it appears exactly as it did when you closed it.
This is yet another feature changed for Windows 7. Instead, each folder window you open in Windows 7 will inherit the location and size of the folder window which was open most recently.
To fix this issue, the ShellFolderFix utility works well, and it’s available for free!
- Download and install the ShellFolderFix program.
- When the program’s icon appears in the notification area (right side of Start menu), double-click its icon to activate the program.
- Windows 7 will now remember where your folder windows are when you close them and, later, when you reopen them, they will be in the same size and location.
A bonus feature of the ShellFolderFix utility is the ability for you to create a “work space” consisting of specific folder views, which you can then open by right-clicking the ShellFolderFix icon and selecting your desired work space.
Get EXTRA-Large Icons
![]() If you have tried to change the size of the icons that appear within Windows Explorer, you have noticed that the views available include Content, Tiles, Details, List, and three icon sizes: Small, Medium, and Large. But what if you need to go even larger?
If you have tried to change the size of the icons that appear within Windows Explorer, you have noticed that the views available include Content, Tiles, Details, List, and three icon sizes: Small, Medium, and Large. But what if you need to go even larger?
It is actually possible to have extra-large icons. Here’s how:
- Click the down-arrow button next to the Change Your View button (in the top-right corner, just below the Search box).
- When the slider bar appears, drag the sliding cursor all the way up to Extra-Large Icons. (If this option does not appear, click Alt + F).
- Your icons should now be extra-large and very easy to see!
Do you know of any other fixes for common Windows 7 annoyances? Feel free to share them with others in the comments below!